


Nowadays most of the developers provide eye-catching navigation drawer in their app, The navigation drawer provides easy navigation inside the application screens.
Ease of navigation is important in both physical and virtual space – John Quelch
In this article, I am going to show you how to create a side menu using the drawer navigation from react-navigation.
At the end of this article, you will have a side menu like this.
If you are not familiar with React Navigation, no worries, I will explain each and every step from the beginning, so without any further delay let’s jump into the code.
First of all, let’s create a new react native application using React Native CLI. To do this run:
react-native init CustomDrawer
Once the application is created we need to install the React Navigation library in our application. run below command to install it.
npm install react-navigation --save
Link the library based on the React Native version you are using.
Now we need to create a stack navigator which is responsible for the navigation stack.
To install Stack Navigator run this command:
npm install react-navigation-stack @react-native-community/masked-view
Once the installation is done, we need to create a file structure in our root directory like this.
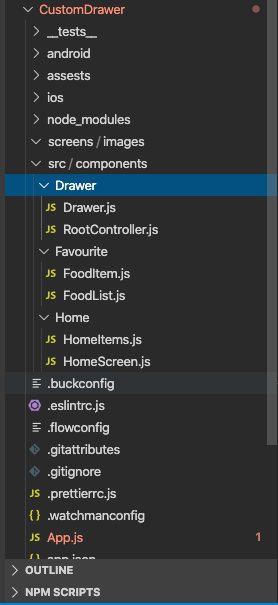
Create one src folder in the root directory,
Now add components folder inside it. This folder will contain all the source files that we will create.
After that create a Drawer folder inside the components folder and add RootNavigation.js file inside it.
RootController will contain the initial root and other stack details.
We will create a Home folder which will contain the HomeItems.js and HomeScreen.js once we create it.
We will also add a Favourite folder which will contain the FoodItem.js and FoodList.js
Now we need to create our stack navigator and drawer navigator to create the navigation stack.
before we use the createDrawerNavigator function from the react-navigation-drawer, we need to install it first, run this command in the terminal to install it
npm install react-navigation-drawer
let’s start writing code once the installation is done.
First of all, we will create a Drawer.js file and will design our side menu.
check this code, it will create a neat and clean side menu drawer that we are going to use in RootContoller file.
Drawer. js is a simple react component that we usually create, you can customize it based on your design.
Now let’s create HomeScreen.js which is our initial screen when our application is opened
HomeScreen is a simple React component which contains the list of items. You can set any screen here or any UI based on requirements.
This is the HomeItems.js which we have imported in our home screen.
Now let’s create a second navigation screen so when we click on a second menu option from the drawer, we can navigate to that screen.
Create a FoodList.js screen using the below code, this file contains the user’s favourite item list.
This is how FoodItem.js looks which we have imported in FoodList.js for the listing of items.
Till now we have created those screens which we are going to use in our navigation and side menu.
Now we need to combine all the files that we have created for the navigation and also we need to set up the Drawer Navigation here.
Let’s create RootController.js which combines HomeScreen Navigation and Favourite Navigation using the createDrawerNavigator function, which is provided by the React Navigation.
Here we created individual navigators to make sure that we can use navigation functionality in each screen as well.
After creating RootController we need to import it in our App.js file, which is the entry point of our application.
import RootController from './src/components/Drawer/RootController'
Now return the RootController inside the App.js so it will be rendered on the screen when the application is started.
This is how App.js will looks
Now we are all set to go, run the application in the simulator, to run the application run react-native run-ios command in the terminal and test it.
react-native run-ios
Also read: Flutter vs React Native: Which Should You Consider?
If you find any difficulties while following this article you can download the full source code from here.
That’s it for now, Thank you for reading ❤️