Featured Image
Software Development

Quick Start: Two Factor Authentication in Django Admin Panel

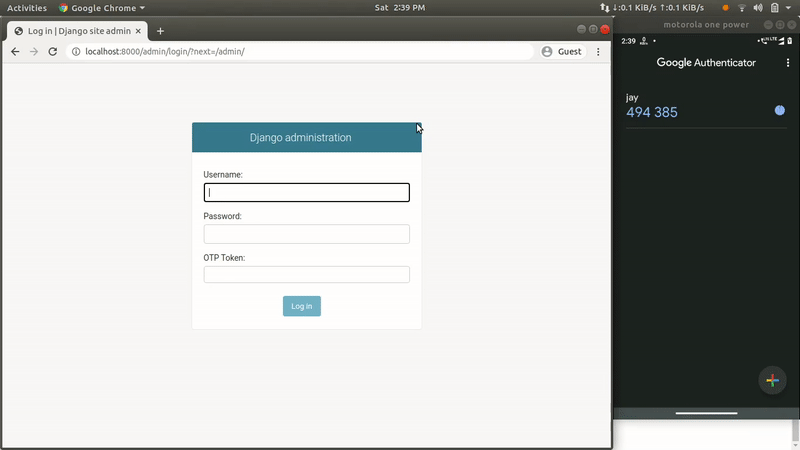
Add 2FA (Two Factor Authentication) using a token generator app like Google Authenticator.

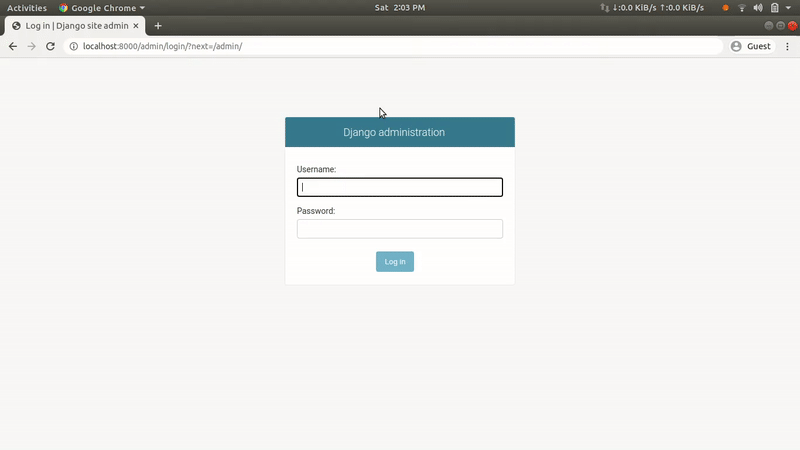
A safe is merely safe till there is a reliable lock protecting it! In this article, I’m going to talk about strengthening the login mechanism of the Django Admin Panel by adding another layer of security.

Two-factor authentication (2FA in short) is one of the many methods of Multi-factor authentication that adds an extra layer of security along with login credentials to confirm user identity. In 2FA, users confirm their identities by a combination of two different factors: 1) something they know, 2) something they have, or 3) something they are.

Here I’m going to build a mechanism where admin users will be prompted to add a Time-based One-time Password (TOTP) at the time of login. As the name “TOTP” suggests, the generated token will only be valid for a specific amount of time (i.e. 30 seconds), and after that, a new token will be auto-generated.


Let’s begin

1) Project setup

We need a Django project to work on, you can use any existing project or create one using the following:

django-admin startproject two_factor_auth_sample

Now we need to have a mechanism that creates fresh OTP from time to time and luckily django-otp python library provides it along with the built-in support for several standard OTP generation algorithms such as HOTP & TOTP. This enables us to easily pair with Google Authenticator using the otpauth URL scheme.

Additionally, if we have the qrcode package installed, the admin interface will generate QR Codes for us automatically! So let’s install both the packages by the following command:

pip install django-otp qrcode

2) Configure 2FA

At this point, we have our project with the necessary dependencies installed. To make it work together we need to add django-otp configurations in the settings.py file.

  1. Add the django_otp & django_otp.plugins.otp_totp in the INSTALLED_APPS list.
  2. Add django_otp.middleware.OTPMiddleware to the MIDDLEWARE list. It must be installed after AuthenticationMiddleware.

Typically the file will look something like this:

INSTALLED_APPS = [
    'django.contrib.admin',
    'django.contrib.auth',
    'django.contrib.contenttypes',
    'django.contrib.sessions',
    'django.contrib.messages',
    'django.contrib.staticfiles',
    'django_otp',
    'django_otp.plugins.otp_totp',
]

MIDDLEWARE = [
    'django.middleware.security.SecurityMiddleware',
    'django.contrib.sessions.middleware.SessionMiddleware',
    'django.middleware.common.CommonMiddleware',
    'django.middleware.csrf.CsrfViewMiddleware',
    'django.contrib.auth.middleware.AuthenticationMiddleware',
    'django_otp.middleware.OTPMiddleware',
    'django.contrib.messages.middleware.MessageMiddleware',
    'django.middleware.clickjacking.XFrameOptionsMiddleware',
]

3) Configure the admin interface

We need to use the OTPAdminSite model in our urls.py file. It will allow us to register for the TOTP device for the first time.

Add the following code before the urlpatterns list.

from django_otp.admin import OTPAdminSite
from django.contrib.auth.models import User
from django_otp.plugins.otp_totp.models import TOTPDevice
from django_otp.plugins.otp_totp.admin import TOTPDeviceAdmin


class OTPAdmin(OTPAdminSite):
    pass


admin_site = OTPAdmin(name='OTPAdmin')
admin_site.register(User)
admin_site.register(TOTPDevice, TOTPDeviceAdmin)

In this snippet, we are simply creating an OTPAdmin class to register User and TOTPDevice model in the admin panel.

Now we need to register our first superuser and create the TOTP Device for him. By TOTP Device I mean the Google Authenticator link for the superuser’s account.

Before running our project, begin with migrating the database using python manage.py migrate and create a superuser using python manage.py createsuperuser command. Now we are ready to run our project with python manage.py runserver command.

At this point, we have a normal Django admin panel (without 2FA) accessible at http://localhost:8000/admin.


4) Setup 2FA for the first user

Go to the Django admin panel at http://localhost:8000/admin and login with the credentials you created while creating a superuser.

To register 2FA, follow the steps mentioned below or see the visual representation:

  1. Go to TOTP devices devices table and click on the “ADD TOTP DEVICE +” button to add your first device.
  2. Select the user from the User table and enter a device name of your choice.
  3. Keep everything as it is and hit on the “Save” button to save the record.
  4. From the listing, click on the qrcode and scan it in your Google Authenticator application or you can share the link manually.
  5. After scanning, it will save this account in the Google Authenticator app and generate Time-based OTP every 30 seconds by default.

Here is the visual representation of the above mentioned steps:


5) Enforce 2FA while login

At this point, we have our TOTP device registered in the Google Authenticator app. Now we can replace the default Django login with the 2FA based login screen.

In the urls.py file, replace the route admin/ which currently points to admin.site.urls to the admin_site.urls. So the final urlpatterns appear as shown below:

urlpatterns = [
    path('admin/', admin_site.urls),
    ...
]

With this change, we are ready to test our 2FA.


6) Test 2FA

Now if you go to the Django admin panel, you will see the username & password fields along with the new field named “OTP Token” to enter Time-based OTP from the Google Authenticator.

Here is the visual demo of the 2FA login.

As you can see, I’ve cast my mobile device screen along with the browser to show you the exact scenario. The token generated by the Google Authenticator is only valid for 30 seconds, and it automatically creates a new token every time. You can add new admin users and their devices by following the same steps.

You can find the source code for the project here.


Also, take a look at this informative blog post comparing React Native and Flutter

This was the quick start guide to add 2FA to your Django admin panel. We can improve the current system by adding backup codes and providing recovery options in case a user loses his code generation device. I have not covered such cases in this blog as I wanted to keep it simple and easy for beginners. Nevertheless, I plan to cover it in a separate blog soon.

Thanks for reading!

author
Jay Patel