In today’s connected world, mobile apps no longer stay confined to our phones; they’re extending into our cars. Apple CarPlay has transformed the in-car experience, allowing users to safely access iPhone apps while keeping their focus on the road. For app developers, this presents an exciting opportunity to bridge the gap between handheld devices and automotive systems. But how can Flutter developers bring their apps into the CarPlay ecosystem?
Flutter has already made a name for itself as a leading framework for cross-platform development. Its ability to create high-performance apps with a single codebase saves time and effort. Now, with the flutter_carplay plugin, integrating CarPlay functionality into Flutter apps is within reach. But while this plugin provides basic support for CarPlay integration, there are certain limitations that developers need to be aware of.
This blog will walk you through integrating CarPlay into your Flutter app, using the flutter_carplay plugin. You’ll learn the setup process, explore CarPlay templates, and tackle some of the challenges that come with working around the plugin’s current limitations.
CarPlay has revolutionized how drivers interact with their smartphones while on the road. By mirroring essential apps from an iPhone onto a car’s infotainment system, CarPlay offers a simplified, distraction-free experience that keeps drivers’ hands on the wheel and eyes on the road.
Key to CarPlay’s success is its focus on functionality that enhances the driving experience. It supports specific categories of apps—navigation, audio, communication, EV charging, and more. By restricting the types of apps it supports, CarPlay ensures that what you’re seeing in the car is safe and easy to use, making complex multitasking a thing of the past.
For developers, this means that integrating with CarPlay isn’t just about replicating your mobile app experience—it’s about adapting your app to be as simple and efficient as possible.
Flutter, with its ability to build cross-platform apps using a single codebase, has become a favorite among mobile developers. When you’re developing an app that you want to run on both iOS and Android, Flutter saves you from writing and maintaining separate codebases. But why should you consider Flutter when it comes to CarPlay integration?
The answer lies in efficiency. By using Flutter, you can leverage the same codebase you’re already using for your mobile app and extend it to support CarPlay functionality. This drastically reduces development time and effort, especially when compared to developing native CarPlay integrations from scratch. Plus, Flutter’s growing ecosystem makes it easier to maintain and scale your app.
However, CarPlay integration with Flutter is still in its early stages. The flutter_carplay plugin gives you access to essential CarPlay functionality, but there are limitations. Advanced CarPlay features like Siri voice commands and complex multi-screen support are still out of reach for now. Despite these limitations, the plugin offers a solid foundation to start building CarPlay-compatible apps.
The flutter_carplay plugin is an open-source project that enables Flutter developers to add CarPlay support to their apps using pre-designed templates. These include Action Sheet, Alert, Grid, List, Tab Bar, Information, and Point of Interest templates. These templates facilitate integrating primary navigation, audio, and communication functionality while adhering to CarPlay’s safe and straightforward UI principles.
However, there are some limitations to be aware of. Advanced features like voice control via Siri still need to be supported, restricting hands-free functionality. Customization options are also minimal, limiting the ability to create unique, branded user interfaces. Additionally, the plugin does not support multi-screen functionality, which is essential for apps that interact with dual-screen systems in modern vehicles. Developers may need to explore custom solutions or native code for these advanced features.
Despite these constraints, the flutter_carplay plugin remains a solid starting point for CarPlay integration in Flutter apps. For more complex use cases, developers can extend the plugin or contribute to its development within the open-source community.
Ready to get started? Let’s walk through setting up the flutter_carplay plugin in your Flutter app.
1. Add the Plugin:
First, add the plugin dependency to your pubspec.yaml file:
dependencies:
  flutter_carplay: latest_version
2. Run Flutter Pub Get:
After adding the dependency, run:
flutter pub get3. iOS Permissions:
For CarPlay to work, you’ll need to configure the required permissions in your Info.plist file. Make sure you add:
<key>UIBackgroundModes</key>
<array>
    <string>audio</string>
</array>
4. Build and Run:
Connect a device compatible with CarPlay and run your Flutter app. If you don’t have access to a physical device, you can use the CarPlay simulator in Xcode.
Also read: Learn How to Upgrade Your Flutter Project to Its Latest Version
Let’s dive into building a simple CarPlay app using the flutter_carplay plugin.
1. The iOS platform version must be set to 14.0. To make it global, navigate to ios/Podfile and copy the first two lines:
 Uncomment this line to define a global platform for your project
+ platform :ios, '14.0'
- # platform :ios, '9.0'
After changing the platform version, execute the following command in your terminal to update your pod files:
// For Apple Silicon M1 chips:
$ cd ios && arch -x86_64 pod install --repo-update
// For Intel chips:
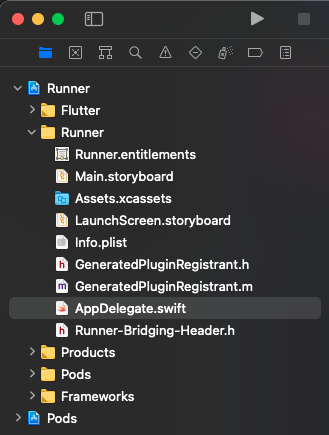
$ cd ios && pod install --repo-update2. Open ios/Runner.xcworkspace in Xcode. In your project navigator, open AppDelegate.swift.
Delete the specified codes below from the application function in AppDelegate.swift, and change it with the code below:
import UIKit
import Flutter
@UIApplicationMain
@objc class AppDelegate: FlutterAppDelegate {
override func application( _ application: UIApplication,
didFinishLaunchingWithOptions launchOptions: [UIApplication.LaunchOptionsKey: Any]?) -> Bool {
- GeneratedPluginRegistrant.register(with: self)
- return super.application(application, didFinishLaunchingWithOptions: launchOptions)
+ return true
}
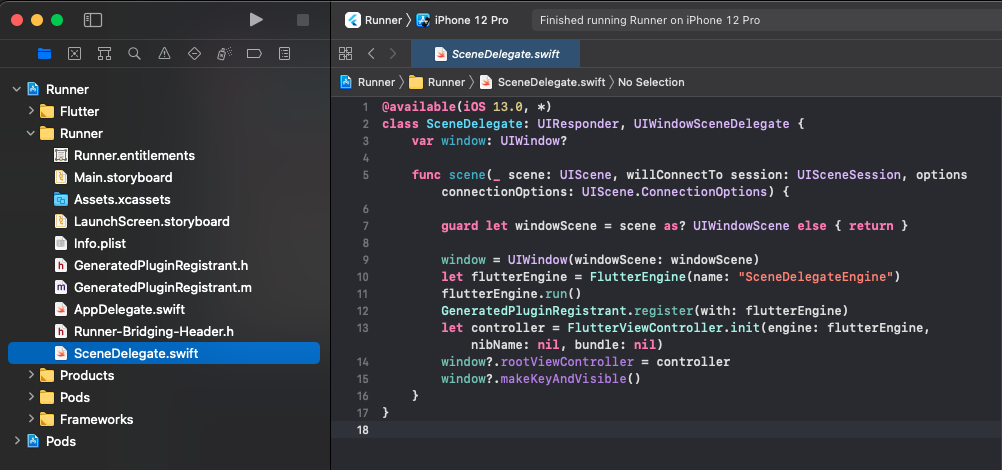
}3. Create a swift file named SceneDelegate.swift in the Runner folder (not in the xcode main project file) and add the code below:
@available(iOS 13.0, *)
class SceneDelegate: UIResponder, UIWindowSceneDelegate {
    var window: UIWindow?

    func scene(_ scene: UIScene, willConnectTo session: UISceneSession, options connectionOptions: UIScene.ConnectionOptions) {
        guard let windowScene = scene as? UIWindowScene else { return }

        window = UIWindow(windowScene: windowScene)

        let flutterEngine = FlutterEngine(name: "SceneDelegateEngine")
        flutterEngine.run()
        GeneratedPluginRegistrant.register(with: flutterEngine)
        let controller = FlutterViewController.init(engine: flutterEngine, nibName: nil, bundle: nil)
        window?.rootViewController = controller
        window?.makeKeyAndVisible()
    }
}
4. One more step, open the Info.plist file whether in your favorite code editor or in the Xcode. I’m going to share the base code, so if you open in the Xcode, you can fill with the raw keys with the values.
<key>UIApplicationSceneManifest</key>
<dict>
  <key>UIApplicationSupportsMultipleScenes</key>
  <true />
  <key>UISceneConfigurations</key>
  <dict>
    <key>CPTemplateApplicationSceneSessionRoleApplication</key>
    <array>
      <dict>
        <key>UISceneConfigurationName</key>
        <string>CarPlay Configuration</string>
        <key>UISceneDelegateClassName</key>
        <string>flutter_carplay.FlutterCarPlaySceneDelegate</string>
      </dict>
    </array>
    <key>UIWindowSceneSessionRoleApplication</key>
    <array>
      <dict>
        <key>UISceneConfigurationName</key>
        <string>Default Configuration</string>
        <key>UISceneDelegateClassName</key>
        <string>$(PRODUCT_MODULE_NAME).SceneDelegate</string>
        <key>UISceneStoryboardFile</key>
        <string>Main</string>
      </dict>
    </array>
  </dict>
</dict>
That’s it, you’re ready to build your first CarPlay app! 🚀 😎
We’ll start by creating a basic place app. The app will display a list of popular locations on the CarPlay interface.
import 'package:flutter/material.dart';
import 'package:flutter_carplay/flutter_carplay.dart';

void main() {
  runApp(const MyApp());
}

class MyApp extends StatefulWidget {
  const MyApp({Key? key}) : super(key: key);

  @override
  State<MyApp> createState() => _MyAppState();
}

class _MyAppState extends State<MyApp> {
  CPConnectionStatusTypes connectionStatus = CPConnectionStatusTypes.unknown;
  final FlutterCarplay _flutterCarplay = FlutterCarplay();

  @override
  void initState() {
    super.initState();

    FlutterCarplay.setRootTemplate(
        rootTemplate: CPListTemplate(
      systemIcon: "systemIcon",
      sections: [
        CPListSection(
          items: [
            CPListItem(
              text: "New Delhi, Delhi, India",
              detailText: "(28.644800, 77.216721)",
              onPress: (complete, self) {
                complete();
              },
            ),
            CPListItem(
              text: "Bengaluru, Karnataka, India",
              detailText: "(12.972442, 77.580643)",
              onPress: (complete, self) {
                complete();
              },
            ),
            CPListItem(
              text: "Yakubpur, Noida, Uttar Pradesh, India",
              detailText: "(28.523951, 77.409950)",
              onPress: (complete, self) {
                complete();
              },
            ),
            CPListItem(
              text: "Chennai, Tamil Nadu, India",
              detailText: "(13.067439, 80.237617)",
              onPress: (complete, self) {
                complete();
              },
            ),
            CPListItem(
              text: "Kolkata, West Bengal, India",
              detailText: "(22.572645, 88.363892)",
              onPress: (complete, self) {
                complete();
              },
            ),
          ],
          header: "Popular Places in India",
        ),
      ],
      title: "Places",
    ));

    _flutterCarplay.addListenerOnConnectionChange(onCarplayConnectionChange);
  }

  @override
  void dispose() {
    _flutterCarplay.removeListenerOnConnectionChange();
    super.dispose();
  }

  void onCarplayConnectionChange(CPConnectionStatusTypes status) {
    // Do things when carplay state is connected, background or disconnected
    setState(() {
      connectionStatus = status;
    });
  }

  @override
  Widget build(BuildContext context) {
    return MaterialApp(
      home: Scaffold(
        appBar: AppBar(
          title: const Text('Places'),
        ),
        body: Column(
          children: [
            Center(
              child: Text(
                'Carplay Status: ' +
                    CPEnumUtils.stringFromEnum(connectionStatus),
              ),
            ),
            ListTile(
              title: const Text("New Delhi, Delhi, India"),
              subtitle: const Text("(28.644800, 77.216721)"),
            ),
            ListTile(
              title: const Text("Bengaluru, Karnataka, India"),
              subtitle: const Text("(12.972442, 77.580643)"),
            ),
            ListTile(
              title: const Text("Yakubpur, Noida, Uttar Pradesh, India"),
              subtitle: const Text("(28.523951, 77.409950)"),
            ),
            ListTile(
              title: const Text("Chennai, Tamil Nadu, India"),
              subtitle: const Text("(13.067439, 80.237617)"),
            ),
            ListTile(
              title: const Text("Kolkata, West Bengal, India"),
              subtitle: const Text("(22.572645, 88.363892)"),
            ),
          ],
        ),
      ),
    );
  }
}
While the flutter_carplay plugin offers a solid foundation for integrating basic CarPlay functionality into Flutter apps, it does come with its fair share of limitations. These roadblocks primarily arise when developers seek to implement more advanced features or wish to go beyond the standard CarPlay templates offered by the plugin.
One of the main limitations of the current plugin is its lack of support for some of CarPlay’s more advanced features. For instance, voice control via Siri is a major feature in most CarPlay-compatible apps, as it allows users to interact with their apps hands-free, which is essential for maintaining driver safety.
Unfortunately, the flutter_carplay plugin does not yet provide native support for Siri-based interactions. This means that apps built using this plugin will miss out on one of CarPlay’s most intuitive and safety-oriented functionalities, forcing developers to either forego Siri integration or develop complex workarounds through native code.
CarPlay offers several predefined UI templates to ensure a consistent, safe user experience across all vehicles. These templates include lists, grids, and information screens, which are relatively straightforward to implement using the plugin.
However, when it comes to more complex UI requirements—such as integrating custom-designed interfaces or handling intricate user interactions—the plugin falls short. Developers are confined to the basic templates provided by CarPlay and have minimal ability to customize the user interface to create unique or branded experiences. This can be particularly limiting for apps that require more visual flexibility, such as those in the entertainment or navigation categories, where unique designs can set the app apart from the competition.
Another challenge arises with multi-screen functionality. Many modern vehicles are equipped with dual-screen setups or infotainment systems that simultaneously display different information types. CarPlay supports multiple displays and user contexts, but the flutter_carplay plugin does not yet fully support such multi-window or multi-context scenarios.
This can become a roadblock for developers working on sophisticated apps that rely on dual screens, such as advanced navigation apps or apps that want to provide secondary information on a passenger display. The current plugin’s single-screen limitation means that developers looking to take advantage of these features might have to dive deeper into native iOS development.
While Flutter is known for delivering high-performance applications, integrating with CarPlay through the flutter_carplay plugin can introduce performance bottlenecks. CarPlay requires apps to maintain a fast, responsive user interface to prevent distractions for the driver.
If the integration is not handled carefully—especially with resource-heavy apps like those involving media playback or live data—performance issues could arise, resulting in laggy interfaces or even app crashes. This is a critical concern, as CarPlay apps need to maintain the highest standards of usability, especially when users are relying on them during high-stakes scenarios like navigation.
Testing CarPlay-enabled apps can also pose a challenge. While Apple’s CarPlay simulator in Xcode provides a basic testing environment, it doesn’t fully replicate the nuances of a real-world driving experience or the variety of infotainment systems across different car manufacturers.
Additionally, certain CarPlay functionalities, such as real-time interactions with a car’s hardware (e.g., steering wheel controls or specific head-up displays), are difficult to test in a simulator. This can lead to issues that only emerge when the app is tested in an actual vehicle, creating delays in the development process. Developers may need to find creative ways to simulate real-world conditions or invest in actual CarPlay-compatible hardware for thorough testing.
The flutter_carplay plugin, while useful, is still relatively new and does not yet offer the robust feature set seen in other mature plugins within the Flutter ecosystem. As a result, developers who run into roadblocks will find fewer resources, tutorials, or community-generated solutions to rely on.
This means that the burden of overcoming these obstacles often falls on the developers themselves, requiring them to dive into native iOS code or even contribute to the plugin’s development. While this presents a challenge, it’s also an opportunity for developers to engage with the open-source community and help evolve the plugin.
For developers who need to overcome these limitations, there are several paths forward:
For more complex CarPlay apps that require features not supported by the flutter_carplay plugin, integrating native iOS code can be the solution. By creating native iOS modules within a Flutter app, developers can access CarPlay’s more advanced features, like custom templates or Siri voice integration, while still leveraging the benefits of Flutter’s cross-platform codebase.
Since flutter_carplay is open-source, developers can contribute by improving its feature set. By addressing limitations such as Siri integration or multi-screen support, you can help push the plugin forward, benefiting the larger Flutter community and making CarPlay more accessible to all.
For teams that want to stick with Flutter but require advanced CarPlay functionality, a hybrid approach might be the answer. This could involve using Flutter for the bulk of the app, while leveraging Swift or Objective-C for CarPlay-specific features, creating a best-of-both-worlds scenario where the app remains cross-platform but still has the native power where it counts.
As we’ve explored in this post, integrating CarPlay with Flutter opens up exciting possibilities for enhancing user experiences and expanding your app’s reach. However, it also presents unique challenges that require expert navigation. Our team of curious and passionate problem solvers is ready to help you overcome these challenges and create a CarPlay integration that truly delights your users.
Also read: Enhancing iOS Development with Custom Xcode Templates
Expertise. With over a decade of experience in digital product development, we bring a wealth of knowledge to your CarPlay integration project.
User-Centric Approach. We think like users but craft like the tech experts we are, ensuring your CarPlay integration is both intuitive and technically sound.
Innovation. We’re always looking ahead, blending creativity with cutting-edge solutions to prepare your product for the users of tomorrow.
Quality. Experience meticulously engineered and designed products that are custom-crafted for delightful user experiences.
For in-depth guidance, refer to the official CarPlay App Programming Guide to ensure you understand best practices and avoid common pitfalls. Also, explore our Flutter app development and iOS app development services to make CarPlay integration seamless. Contact us today.